Xla Optimizations
Accelerated Linea Algebra JIT Compiler Optimization
Difficulty: Advanced
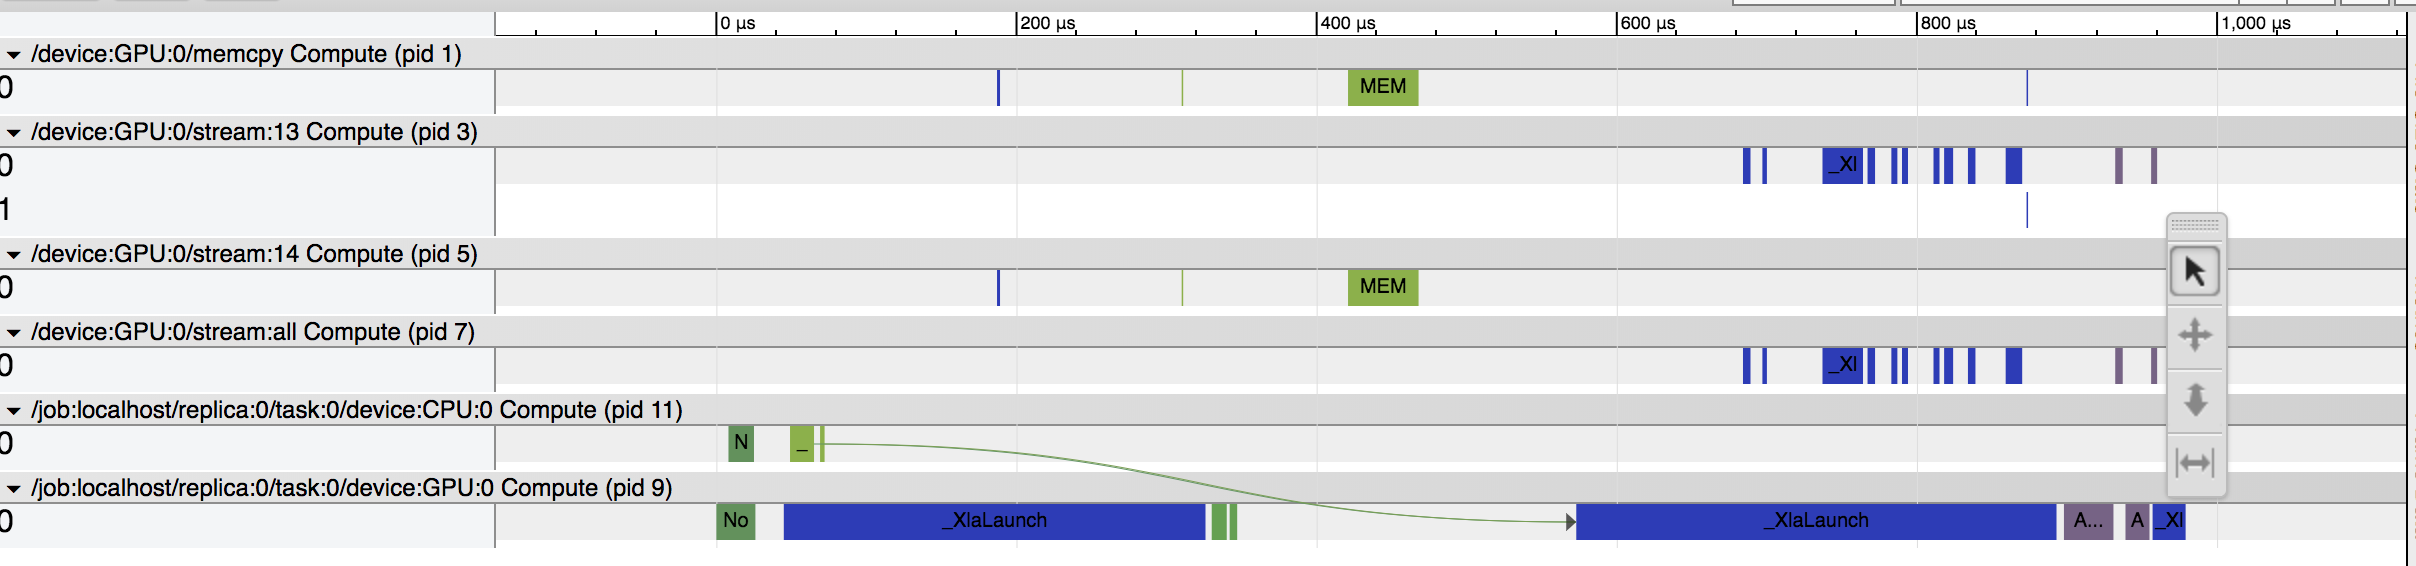
The XLA compiler available for tensorflow must be custom-built from source, and is only compatible with Nvidia devices with compute capability 5.2 or greater (P100 or better!). Though extremely difficult to get working, it is well worth the trouble, as these traces below demonstrate:
No XLA on the System:

XLA on System but Disabled:
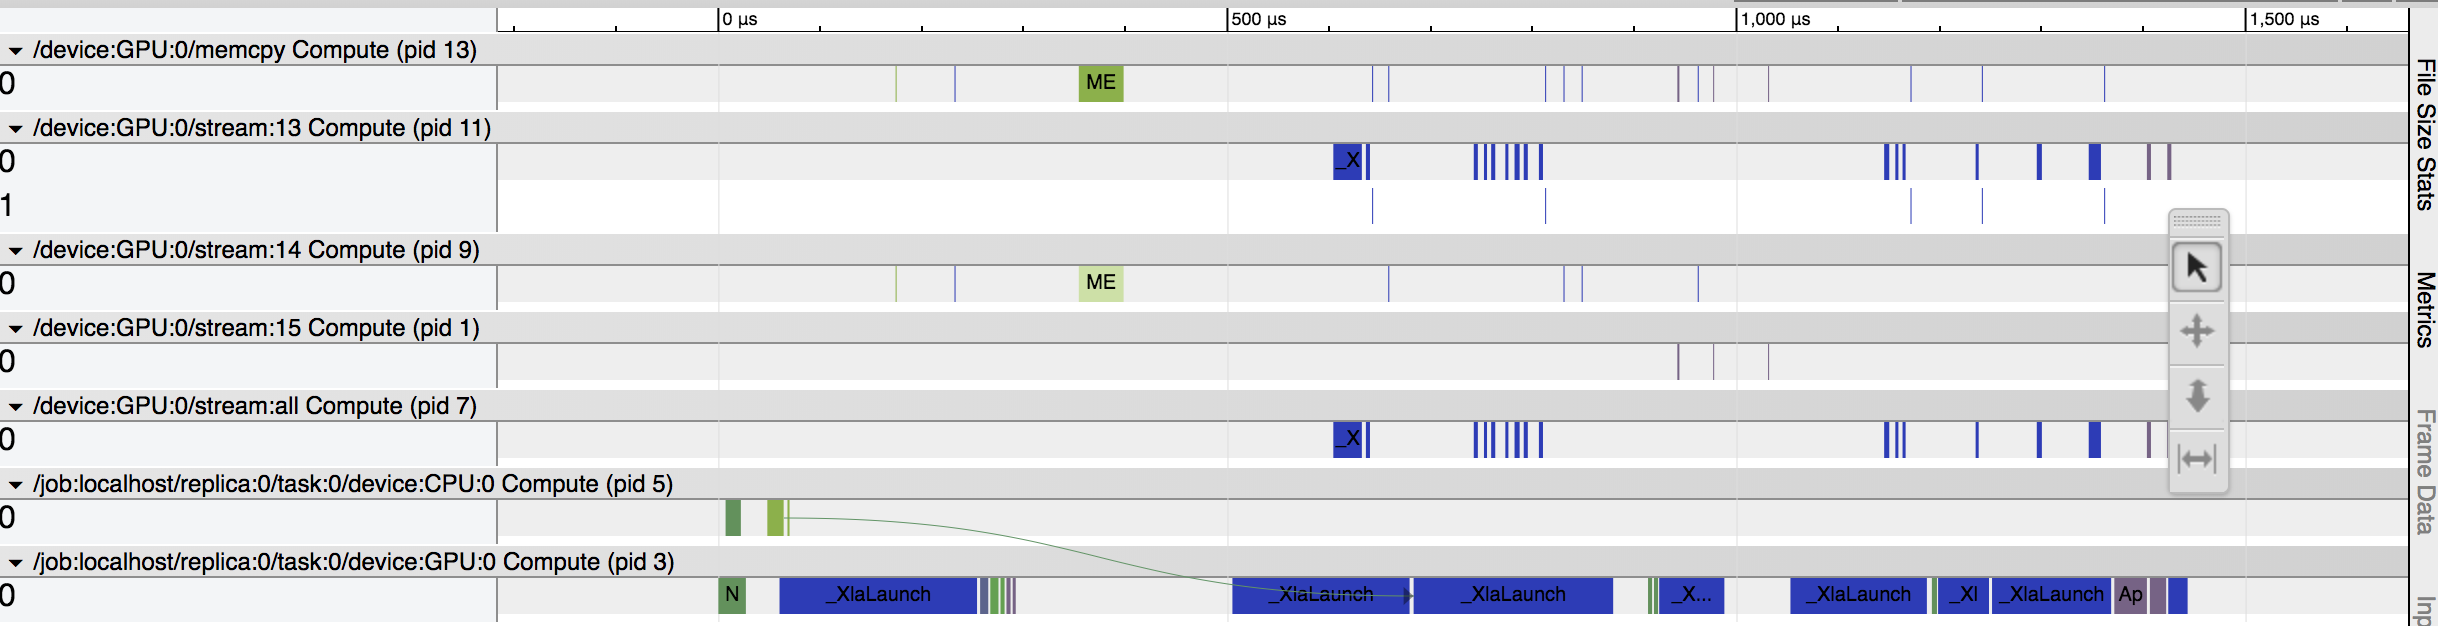
XLA on System Enabled:
Background
Like many compilers, XLA produces an intermediate representation (IR) from the original tensorflow code, with which it analyzes whether or not certain linear algebra calculations can be fused together to execute more efficiently. When executed well, this methodology can significantly reduce running time on CPU and GPU, reduce memory usage, and enable cross-platform compatibility. Tensorflow has published a series of posts detailing the techincal details of XLA here.
Setup Guide
What follows is a step-by-step guide to build, install, and test the Tensorflow XLA JIT compiler. Unfortunately, since the software is still in experimental development phase, we were only able to demonstrate its use with some very specific system settings. Briefly, this process involves taking an existing docker container from an Nvidia managed image repository, updating its configurations so that we may rebuild tensorflow from scratch on it, and pip-installing the generated .whl. Testing, as in previous posts, all takes place within the safety of the docker container so as not to contaminate the host system’s settings.
- Hardware Configuration
- Gcloud Copmute instance
- 8x vCPUs, 30G RAM
- 1x Nvidia Tesla P100 GPU
- 256G SSD Drive
- System Requirements
- Install and configure nvidia-docker2, setup your NGC account as per the steps detailed in this series of posts by Dr. Donald Kinghorn.
- Download the
nvidia/tensorflowdocker container.$ docker pull nvcr.io/nvidia/tensorflow:18.04-py3 - Make a directory to do your build
$ mkdir TF-build $ cd TF-build $ export REPO=`pwd` - Download tensorflow source code (leave it at version 1.8). Also, pull down the XLA mnist test example from the Tensorflow website.
$ git clone https://github.com/tensorflow/tensorflow $ wget https://raw.githubusercontent.com/tensorflow/tensorflow/r1.8/tensorflow/examples/tutorials/mnist/mnist_softmax_xla.py $ cd tensorflow/ - Setup docker container build directory
$ mkdir dockerfile $ cd dockerfile - Supply the necessary dependency files/hosts for Anaconda and Bazel. Note that if you are using another system aside from x86-linux you will need to acquire the appropriate anaconda file.
$ wget https://repo.anaconda.com/archive/Anaconda3-5.1.0-Linux-x86_64.sh $ echo "deb [arch=amd64] http://storage.googleapis.com/bazel-apt stable jdk1.8" > bazel.list - Create the Dockerfile. Save the following as “Dockerfile”, with a capital D!
# Dockerfile to setup a build environment for TensorFlow # using Intel MKL and Anaconda3 Python # We are modifying the existing Nvidia container FROM nvcr.io/nvidia/tensorflow:18.04-py3 # Add a few needed packages to the base Ubuntu 16.04 # OK, maybe *you* don't need emacs :-) RUN \ apt-get update && apt-get install -y \ build-essential \ curl \ emacs-nox \ git \ openjdk-8-jdk \ && rm -rf /var/lib/lists/* # Add the repo for bazel and install it. # I just put it in a file bazel.list and coped in the file # containing the following line # deb [arch=amd64] http://storage.googleapis.com/bazel-apt stable jdk1.8 COPY bazel.list /etc/apt/sources.list.d/ RUN \ curl https://bazel.build/bazel-release.pub.gpg | apt-key add - && \ apt-get update && apt-get install -y bazel # Copy in and install Anaconda3 from the shell archive # Anaconda3-5.1.0-Linux-x86_64.sh COPY Anaconda3* /root/ RUN \ cd /root; chmod 755 Anaconda3*.sh && \ ./Anaconda3*.sh -b && \ echo 'export PATH="$HOME/anaconda3/bin:$PATH"' >> .bashrc && \ rm -f Anaconda3*.sh # That's it! That should be enough to do a TensorFlow 1.7 CPU build # using Anaconda Python 3.6 Intel MKL with gcc 5.4 - Build the modified
nvidia/tensorflowcontainer and run it. Note: make sure$REPOis set to your TF-build directory.$ docker build -t tf-build-1.8-gpu-mkl-xla . $ docker run --runtime=nvidia --rm -it -v $REPO:/root/TF-build tf-build-1.8-gpu-mkl-xla - Configure Tensorflow. You should now be greeted with a custom CLI prompt, which indicates that we are running inside the container.
> cd root/TF-build/tensorflow- You will need to manually edit the
configure.pyscript here to get the correct settings:
- Change the default
_DEFAULT_CUDA_COMPUTE_CAPABILITIES = '6.0' - Turn on XLA with
set_build_var(environ_cp, 'TF_ENABLE_XLA', 'XLA JIT', 'with_xla_support', True, 'xla')- Now you can run the script as before…> python configure.py- Say yes to "jemalloc support", and no to every other prompt (including CUDA support, as we are not yet demonstrating GPU).
- You will need to manually edit the
- Build Tensorflow. Warning: This can take quite some time, on the order of 5-6 HOURS in the case of our GCP instance. Compute time with the P100 is expensive, so proceed at your own risk!
> bazel build //tensorflow/tools/pip_package:build_pip_package - Create the pip package
> bazel-bin/tensorflow/tools/pip_package/build_pip_package ../tensorflow_pkg - Create a new conda environment and install the custom Tensorflow build
> conda create -n tftest > source activate tftest > cd ../ && pip install tensorflow_pkg/tensorflow-1.8.0-cp36-cp36m-linux_x86_64.whl - Test that your XLA is working by running the mnist example and examining the generated
timeline.ctf.jsonfile viachrome://tracing. (From this Tensorflow XLA tutorial)> TF_XLA_FLAGS=--xla_generate_hlo_graph=.* python mnist_softmax_xla.py